Jarrett's Tech Blog - For July 2008
-
WCF Adds Root Node on IXmlSerializable Object
Has anybody else had trouble with WCF adding a root node on their objects that implement IXmlSerializable?
Here is the setup:
- Create a class that implements IXmlSerializable
public class Entry : IXmlSerializable { public XElement Xml { get; set; } public void ReadXml(XmlReader reader) { Xml = XElement.Load(reader, LoadOptions.SetBaseUri); } public void WriteXml(XmlWriter writer) { Xml.WriteTo(writer); } }- Create a WCF service that returns the object.
[ServiceContract]
[XmlSerializerFormat]
public interface IService
{
  [OperationContract]
  [WebGet(BodyStyle = WebMessageBodyStyle.Bare, UriTemplate = "{a}/{b}/{c}")]
  Entry RetrieveEntry(string a, string b, string c);
}

public class Service: IService
{
  public Entry RetrieveEntry(string a, string b, string c)
  {
    return new Entry
    {
      Xml = new XElement("test", a + "/" + b + "/" + c);
    }
  }
}
When hitting the service located at http://localhost/EntryService.svc/one/two/three, I expect to get the following xml:<test>one/two/three</test>
Instead, I always get the above xml wrapped in a root node as shown below:<Entry xmlns="http://schemas.datacontract.org/2004/07/EntryTest"> <test>one/two/three</test> </Entry>
- I've set the BodyStyle to Bare
- I've set the [XmlSerializerFormat] attribute
- I've tried putting [XmlRoot(null)] on the Entry class
Update (7/27): It appears you must use the XmlRootAttribute to accomplish this. Your WriteXml(XmlWriter writer) method can check to see if the root node was already added by the serializer, and if not add it:
public void WriteXml(XmlWriter writer)
{

    //only start document if needed
    bool start = false;
    if (writer.WriteState == WriteState.Start)
    {
        start = true;
        writer.WriteStartDocument();
        writer.WriteStartElement("root", "http://example.com");
    }
    //TODO: custom serialization here

    if (start)
    {
        writer.WriteEndElement();
        writer.WriteEndDocument();
    }
}
This allows the WriteXml to be usable even when the object isn't being serialized by the WCF serializer.
-
BlogSvc - New Blogging Service for .NET 3.5
Update: BlogService now has it’s own website, see http://blogsvc.net
I've started a new project on CodePlex called BlogService. Eventually, it will have it's own website at blogsvc.net. The point of this project is to provide a robust back-end for a blog site. It uses the provider model design pattern for abstracting the data layer similar to ASP.NET providers. I've uploaded a design diagram of the major classes. It also contains a WCF service that will expose multiple endpoints (soap, rest, json).
To kick things off, I created a community preview release that includes the following functionality:
- BlogProvider
- XmlBlogProvider
- Business (Blog, BlogSite, BlogComment, etc.)
- Configuration
- Unit Tests
- WCF Service
- Multi-site support
This release provides most of the functionality needed to support a front-end blogging site. It does not include web pages yet.
-
Team System Quick Start Links
Here are some great links to jump-start your learning about VSTS.
Visual Studio 2008 Product Comparison - Use this to figure out which version you or your team members will need.
Patterns & Practices: Team Development with TFS Guide - Great guide for understanding best practices around TFS. This is a must read.
Rob Carbon's Blog : Provides Links to Team System Resources
TFS Event Subscriptions - Tool to create nice customized email subscriptions to TFS events.
Visual Studio Team System 2008 Team Foundation Server Power Tools - Build notification, process template editor, custom check-in policy pack, and more.
Team System Rocks: Provides Tutorial Videos and Other Info
Open Source Addins on CodePlex - Large amount of community support projects with plugins and customizations for Team System.
Vertigo Software Blog: Visual Studio Team System: tips, tricks, and techniques - A good blog that contains common error messages and tips for customizing or extending the usage of team system. It also has a good comparison between the different editions of team system (for 2005 version but still relevant for 2008).
When and how does my solution go "offline"? - This blog helps explain how and why a solution will go offline. I particularly found the the registry setting useful when I could not bind my solution / projects to the server. Team Explorer thought the server was offline when it really wasn't.
-
Comments Security Hole in BlogEngine.NET 1.4
I found a hole in BlogEngine.NET that allows anyone to delete and approve comments.
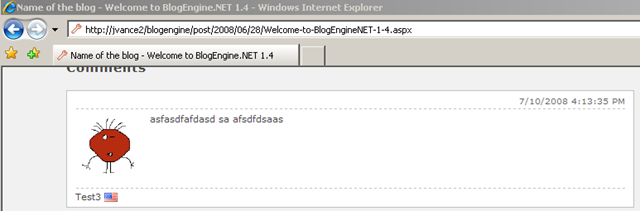
UPDATE 7/11: Fixed in 1.4.0.12Verify the Hole
- Add a test comment to your blog
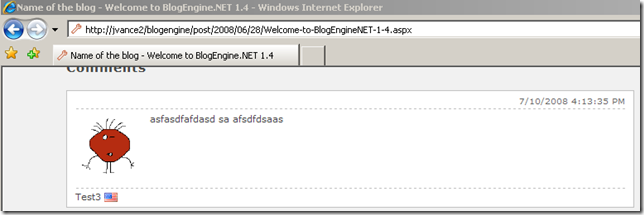
- Refresh the blog posting to retrieve latest source
- View source of blog posting
- Find guid of comment to delete (see line 103 below)
<div id="id_9c2b8578-1dde-421e-94ff-5ea7e0d82012" class="comment"> <p class="date">7/10/2008 4:13:35 PM</p> <p class="gravatar"><img src="http://www.gravatar.com/avatar/b642b4217b34b1e8d3bd915fc65c4452.jpg?s=80&d=..." alt="Test3" /></p> <p class="content">asfasdfafdasd sa afsdfdsaas </p> <p class="author"> Test3 <img src="/blogengine/pics/flags/us.png" class="flag" alt="us" /> </p> </div>- Request a POST to BlogPostUrl.aspx?deletecomment=guid
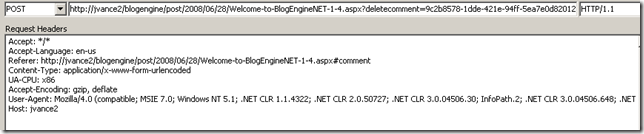
- Refresh the page and notice comment is deleted
Patch the Hole
You can patch the hole by updating the Page_Load event in the CommentView.ascx.cs file by checking for an authenticated user (lines 117,118, & 127)
protected void Page_Load(object sender, EventArgs e)
{
  if (Post == null)
    Response.Redirect(Utils.RelativeWebRoot);

  if (!Page.IsPostBack && !Page.IsCallback)
  {
    if (Page.User.Identity.IsAuthenticated)
    {
      if (Request.QueryString["deletecomment"] != null)
        DeleteComment();

      if (!string.IsNullOrEmpty(Request.QueryString["approvecomment"]))
        ApproveComment();

      if (!string.IsNullOrEmpty(Request.QueryString["approveallcomments"]))
        ApproveAllComments();
    }

  string path = Utils.RelativeWebRoot + "themes/" + BlogSettings.Instance.Theme + "/CommentView.ascx";
Repeat the steps given above to verify that the hole has been patched.
In the process of adding OpenID support to the comment system in BlogEngine.NET I found myself deep in a rabbit hole of refactoring. This comment security issue is just one of the things I've found during my journey. I've reported the issue on the BlogEngine.NET Issue Tracker. I think it is important to point out that the patch above is just a quick fix. The proper solution is to put authorization checks in the business layer (the BlogEngine.Core.Post business object in this case).
-
Blog Comments
Notifications Ajax Preview coComments Captcha FlagImage? CheckAuthorName BbCode Impersonation
-
Add OpenID to BlogEngine.NET 1.4 Part 1
Update : there is no Part 2 as I switched to AtomSite for my blog engine.
Here is a guide on how to add OpenID support to BlogEngine.NET 1.4. This first blog post will detail how to use an OpenID account to login as an existing blog user via impersonation. I've used Andrew's blog post How to add OpenID support to BlogEngine.NET as a starting place.
Pros
- Quick, minimum changes required
- Retains support of blogging tools (such as Live Writer)
- Easy to understand and backwards compatible
Cons
- Not "true" OpenID integration
- Accounts are maintained separately
- Impersonation file is required
Step 1: Download latest release of dotnetopenid library
Step 2: Place DotNetOpenId.dll into Bin folder (if compiling BlogEngine.Web then add reference to project)
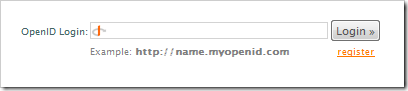
Step 3: Update Login.aspx page
- Add
<%@ Register Assembly="DotNetOpenId" Namespace="DotNetOpenId.RelyingParty" TagPrefix="RP" %>
- Replace
<asp:Login ID="Login1" runat="server" class="loginbox" />
with
<RP:OpenIdLogin ID="OpenIdLogin1" runat="server" onloggedin="OpenIdLogin1_LoggedIn" />
Step 4: Update Login.aspx.cs code behind file
- Replace
protected void Page_Load(object sender, EventArgs e)
{
  if (Page.User.Identity.IsAuthenticated)
  {
    changepassword1.Visible = true;
    changepassword1.ContinueButtonClick += new EventHandler(changepassword1_ContinueButtonClick);
    lsLogout.Visible = true;
    Login1.Visible = false;
    Page.Title += Resources.labels.changePassword;
  }
  else
  {
    Login1.LoggedIn += new EventHandler(Login1_LoggedIn);
    Login1.FindControl("username").Focus();
  }
}
with
protected void Page_Load(object sender, EventArgs e) { if (Page.User.Identity.IsAuthenticated) { changepassword1.Visible = true; changepassword1.ContinueButtonClick += new EventHandler(changepassword1_ContinueButtonClick); lsLogout.Visible = true; OpenIdLogin1.Visible = false; Page.Title += Resources.labels.changePassword; } }- Replace
void Login1_LoggedIn(object sender, EventArgs e)
{
  if (!Roles.IsUserInRole(Login1.UserName, BlogEngine.Core.BlogSettings.Instance.AdministratorRole))
    Response.Redirect(BlogEngine.Core.Utils.RelativeWebRoot, true);
}
with
protected void OpenIdLogin1_LoggedIn(object sender, DotNetOpenId.RelyingParty.OpenIdEventArgs e)
{
  //don't allow login control to login, we will do that manually
  e.Cancel = true;
  //get impersonated user
  string user = Impersonation.Impersonate(e.ClaimedIdentifier);
  if (!Roles.IsUserInRole(user, BlogEngine.Core.BlogSettings.Instance.AdministratorRole))
    Response.Redirect(BlogEngine.Core.Utils.RelativeWebRoot, true);
  else
    FormsAuthentication.RedirectFromLoginPage(user, OpenIdLogin1.RememberMe);
}
Step 5: Add Impersonation.xml file to App_Data folder
<impersonation>
  <impersonate>
    <id>http://jarrettv.myopenid.com/</id>
    <user>Jarrett</user>
  </impersonate>
</impersonation>
Step 6: Add Impersonation.cs to BlogEngineCore project and compile
using System;
using System.Linq;
using System.Xml.Linq;
using System.Web;
using System.Web.Hosting;

namespace BlogEngine.Core
{
    public class Impersonation
    {
        public static string Impersonate(string id)
        {
            string user = id;
            string path = BlogSettings.Instance.StorageLocation + "impersonation.xml";

            if (!VirtualPathUtility.IsAppRelative(path))
                throw new ArgumentException("xmlFileName must be app-relative");

            string fullyQualifiedPath = VirtualPathUtility.Combine
                (VirtualPathUtility.AppendTrailingSlash
                (HttpRuntime.AppDomainAppVirtualPath), path);

            string actualPath = HostingEnvironment.MapPath(fullyQualifiedPath);

            XDocument xDoc = XDocument.Load(actualPath);
            user = xDoc.Element("impersonation").Elements("impersonate")
                .Where(x => x.Element("id").Value == id).Select(x => x.Element("user")).Single().Value;
            return user;
        }
    }
}
Step 7: Deploy following changed files
- Login.aspx
- Login.aspx.cs
- \Bin\BlogEngine.Core.dll
- \Bin\DotNetOpenId.dll
- \App_Data\Impersonation.xml
In the next part, I will add OpenID support to the comment system.